
How to upload a website to hosting via File Manager and cPanel from A to Z
Uploading a website to hosting is an essential step to bring your site online. It is not just about transferring files but also ensuring everything runs smoothly and securely. This guide walks you through the steps, from preparing files and databases to using the right upload tools.
Key points to remember
Before you start uploading, keep these essentials in mind:
✅ What to prepare before uploading: Website files, database, control panel access, and an FTP client like FileZilla.
✅ Ways to upload: Choose a reliable host, then use File Manager, FTP, WordPress plugins, SSH, or provider support.
✅ Why upload to hosting: Makes your site public, improves security, boosts speed, and simplifies management.
✅ Four steps to upload a website:
- Upload website files to
public_htmlvia File Manager or FTP. - Verify files are in the correct location.
- Create a database in cPanel, import via phpMyAdmin, and configure the connection.
- Visit the website to confirm everything works.
What do you need before uploading a website?
Prepare the following:
- Website files: These can be the contents of your old
public_htmlfolder, source code, or the latest backup.
📌 Note for React/Vue.js deployments
When building a React or Vue.js app, you do not upload the full source code, only the static build output.
🔹 Build and zip steps:
- Run the build command:
- React:
1npm run build- Vue.js:
1npm run build- The output folder is usually
build/(React) ordist/(Vue.js).- Zip the
buildordistfolder before uploading.📤 Uploading to the server:
- With cPanel, extract directly in
public_html.- With SSH/SFTP, upload and unzip using:
1unzip build.zip -d /var/www/html/- Ensure your Apache/Nginx config points to the folder containing
index.html.
- Database file (if applicable).
- Control panel access for the new hosting account.
- FTP client such as FileZilla.
To upload, access your hosting control panel via an FTP client like FileZilla. If your site already exists, use the CMS or cPanel backup feature to download it and upload to the new host.
Choose a reliable hosting provider
Quality hosting affects both speed and long-term performance. Choose carefully based on:
- Live support: 24/7 customer support for quick issue resolution.
- Account control: Full access to cPanel or equivalent tools.
- Scalability: Ability to upgrade storage, bandwidth, or domains.
- Clear refund policy: Flexible refunds for testing services.
- Free add-ons: SSL, scheduled backups, or free migrations.
- ICANN-accredited domains: Protect your brand with trusted domain registration.
Note: Review provider reputation and user feedback on forums or review sites before deciding.
Choose a website upload method
There are five main ways to upload a website depending on your tools and needs:
Use File Manager
File Manager is a web-based file tool built into cPanel or other hosting dashboards.
Pros:
- Free.
- Easy to use.
Cons:
- Upload size limits (usually 256 MB).
- Can only extract archives within that size limit.
Note: For larger files, use FTP and unzip via SSH.
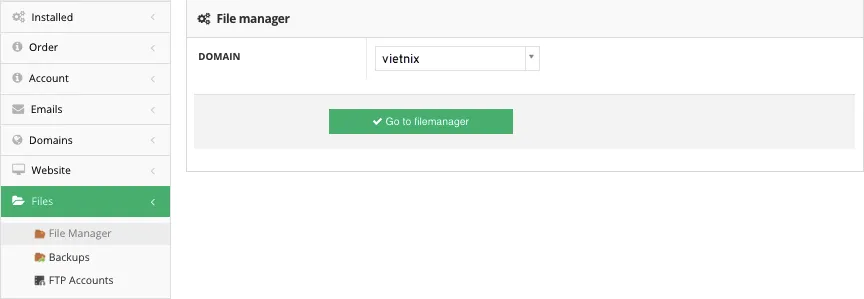
Figure 1: Access File Manager
Use FTP
FTP (File Transfer Protocol) lets you upload files using an FTP client like FileZilla. This is efficient and has no upload size limit.
Pros:
- No upload size limits.
- Faster for large files.
Cons:
- Requires an FTP client.
- Requires FTP credentials from your host.
- Lower security, use SFTP for better protection.
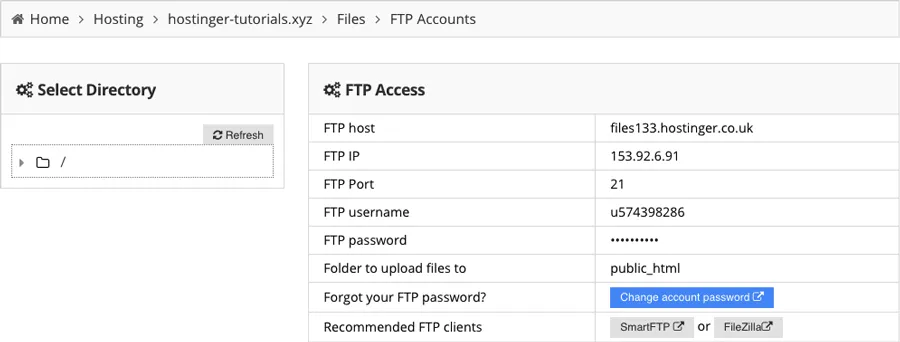
Figure 2: FTP details
Use WordPress migration plugins
If you use WordPress, plugins like All in One WP Migration can move your entire site automatically.
Pros:
- Easy to use with minimal technical knowledge.
- Simple drag and drop workflow.
Cons:
- Upload size limits (usually 256 MB).
- For larger files, use FTP + SSH.
Note: After upload, move files out of subfolders into
public_htmlso the site loads correctly.
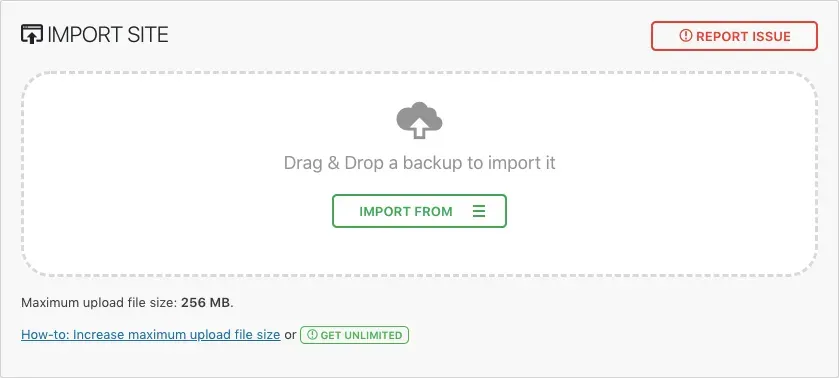
Figure 3: Use WordPress Migration Plugin
Use SSH (Secure Shell)
SSH lets you upload and manage files via command line, ideal for large files or high speed.
Pros:
- Fast with no size limits.
- Extract archives directly on the server.
Cons:
- Requires basic command-line skills and SSH access.
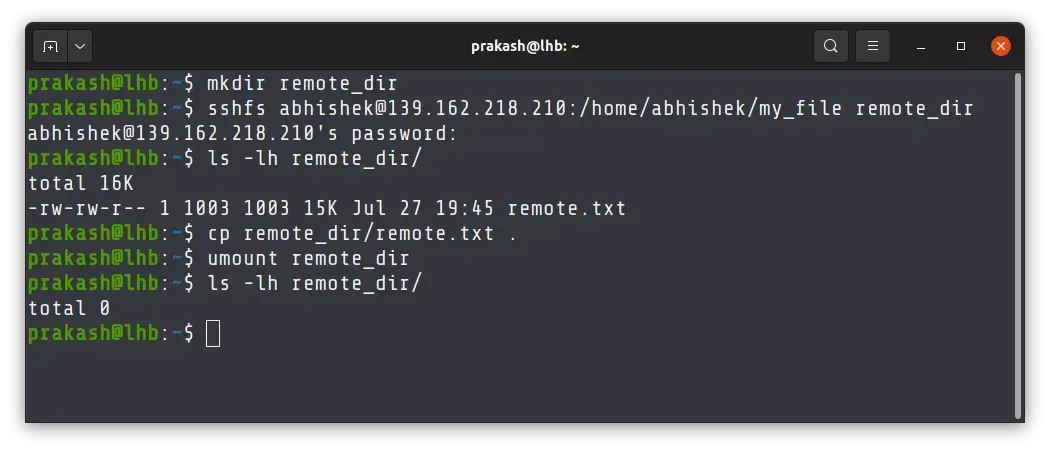
Figure 4: Upload via SSH
Use Import Site (automatic importer)
Some hosting providers offer an Import Site tool that uploads and extracts a website into public_html.
Pros:
- Quick and easy upload.
- Minimal technical effort.
Cons:
- Depends on whether your host supports the tool.
Tip: Ask your hosting provider if they support site import.
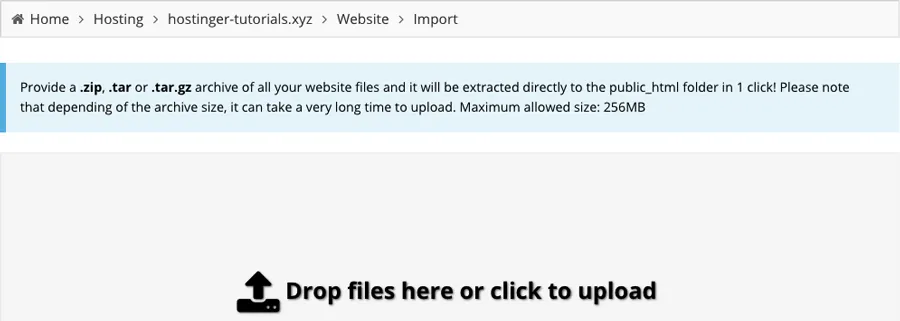
Figure 5: Import Site tool
Ask hosting support
Most providers offer migration help, especially if you are switching hosts.
Pros:
- Saves time and avoids technical mistakes.
- Done by experts.
Cons:
- May be a paid service.
- Depends on support availability.
Tip: Check the provider’s migration policy before requesting support.

Figure 6: Ask hosting support
📌 Notes after uploading
- Move all data from subfolders into
public_htmlso the site loads correctly.- Check file structure and database connections to avoid runtime errors.
- Choose the best method based on file size, platform, and your skills.
Why you should upload a website to hosting
Uploading to hosting is required to make your site public, but it also brings major benefits in security, performance, and reliability:
Publish your website globally
When hosted, your website becomes accessible worldwide via your domain name. Otherwise, only your local machine can access it.
Security and data safety
Professional hosting provides strong security measures such as SSL certificates, firewalls, and data protection tools. This keeps your site and brand data safe from attacks and breaches.
Speed and performance
Hosting servers are optimized for high traffic and fast internet speeds, improving page load times and user experience while reducing lag.

Figure 7: Speed and performance
Stability and reliability
Hosting providers manage the hardware and network, ensuring high uptime so your website stays available without long downtime.
Easy management
Hosting dashboards make it easy to back up data, upgrade software, and optimize performance.
Scalability and long-term growth
Hosting services scale with your traffic and resource needs, unlike personal machines that struggle with growth.

Figure 8: Scalability and growth
In short, hosting your website improves security, performance, stability, and manageability. It is the foundation for sustainable growth and easy global access.
Step 1: Choose how to upload website files
Method 1: Upload via File Manager in cPanel
Method 2: Upload via FTP client
After you choose a method, follow the guide below.
—Method 1: Upload via File Manager in cPanel— (Easiest)
Access cPanel and follow these steps:
Step 1: Click File Manager under the Files section.
Choose File Manager Illustration: Choose File Manager
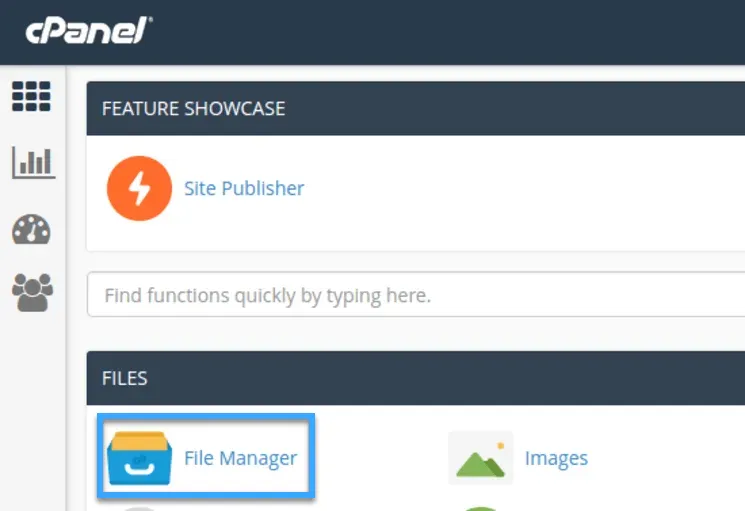
Choose File Manager
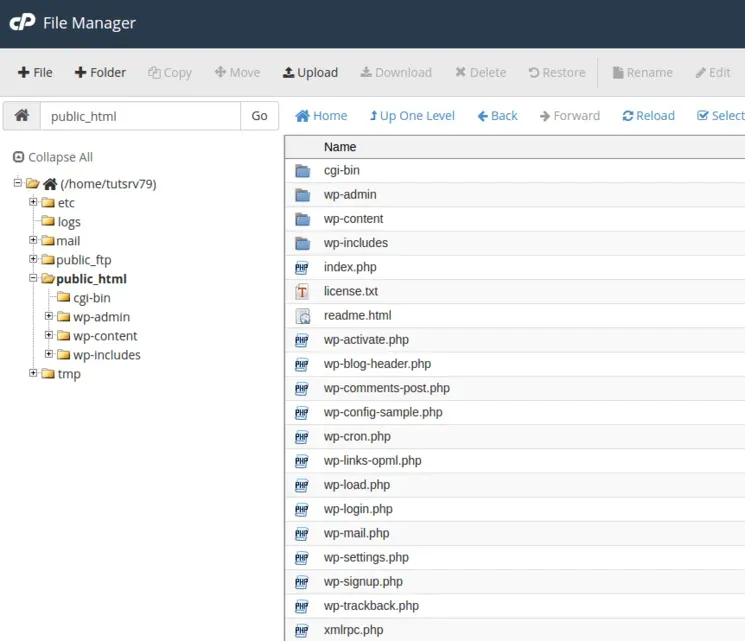
Step 2: In File Manager, open the public_html folder.
Open public_html Illustration: Open public_html
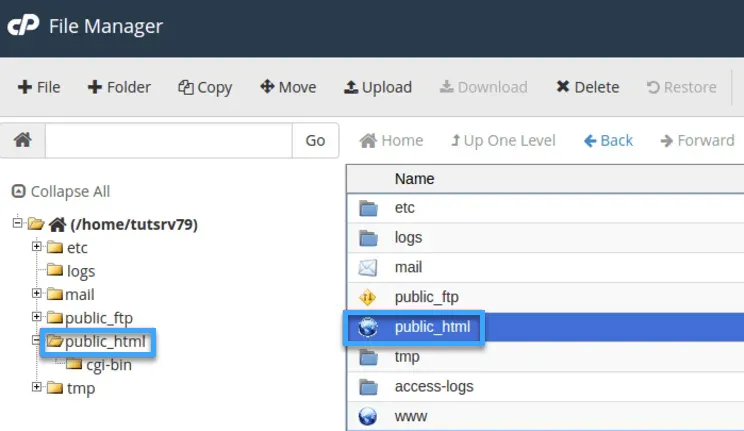
Open public_html
Step 3: Click Upload inside public_html.
Click Upload Illustration: Click Upload
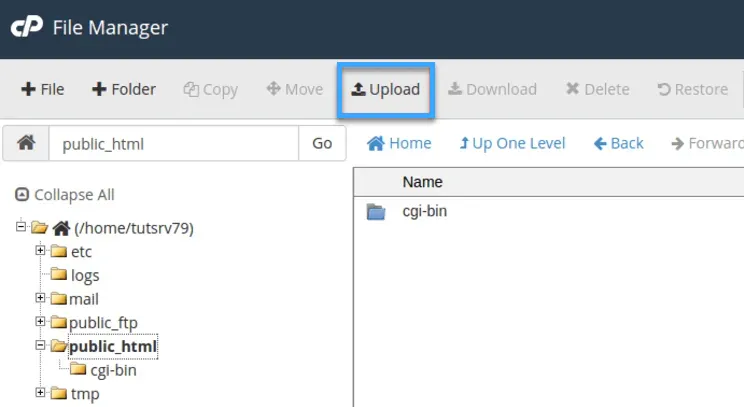
Click Upload
Step 4: Use Select File to pick files or drag and drop into the upload area.
Select file Illustration: Select file
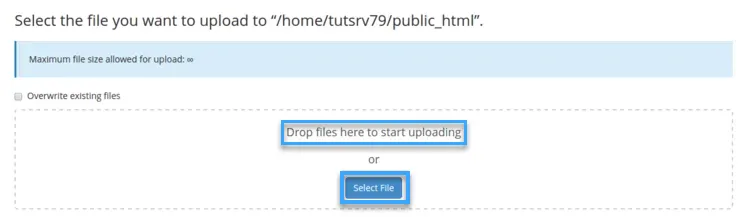
Select file
Step 5: In this example, drag and drop wordpress.zip.
Select wordpress zip Illustration: Select wordpress zip (or dist.zip/build.zip)
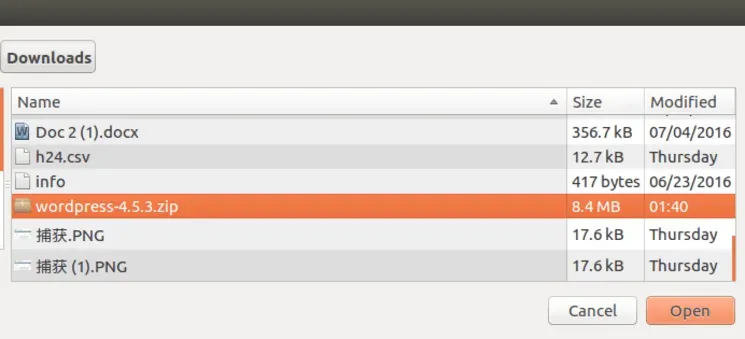
Select wordpress zip
Step 6: After upload, return to File Manager. The archive appears in public_html. Right-click and choose Extract.
Extract file Illustration: Extract file
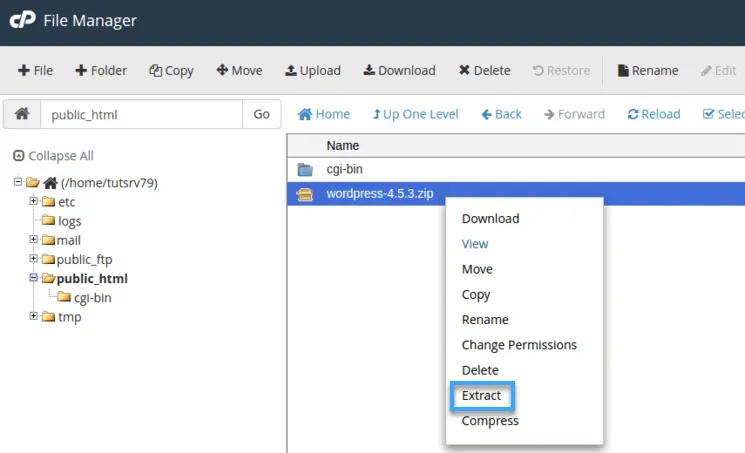
Extract file
Step 7: Choose the extraction location. In this example, use /public_html.
Choose extraction location Illustration: Choose extraction location
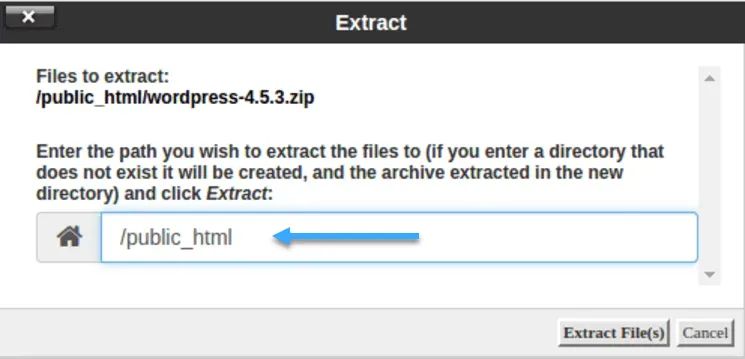
Choose extraction location
Step 8: After extraction, you will see the files in public_html. This is the website root.
Return to the original folder Illustration: Return to the original folder
Return to the original folder
Step 9: The website is now uploaded. Enter your URL in a browser to visit.
Language selection during WordPress setup (If applicable)
—Method 2: Upload via FTP client—
Some users prefer FTP clients like FileZilla, SmartFTP, CoreFTP, or similar tools. In this guide, we use FileZilla.
Notes before uploading via FTP:
- Your skills: If you are new to hosting, File Manager is easier. If you are experienced, FTP is faster.
- Website size: Large websites are easier with FTP because there are no upload limits.
- Special requirements: If you need special server configuration, check with your hosting provider.
Step 1: Get FTP information via FTP Access. If you forgot the password, reset it under Change account password.
Get FTP Access details Illustration: Get FTP Access details
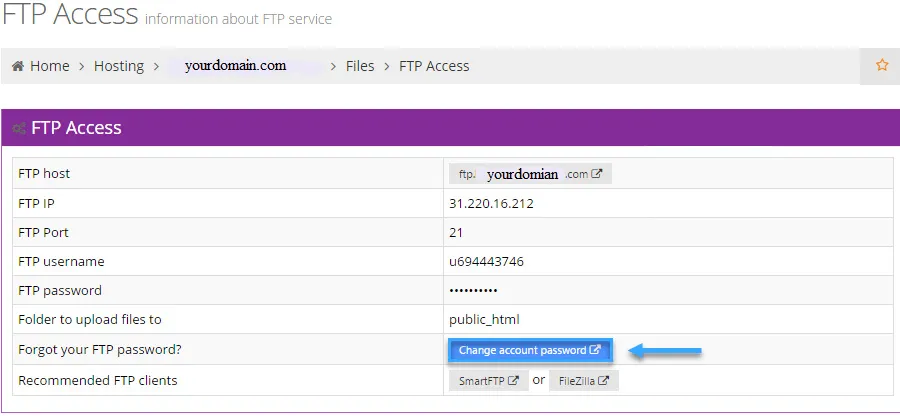
Get FTP Access details
Step 2: Open FileZilla, enter FTP details, and click Quickconnect.
Click Quickconnect Illustration: Click Quickconnect

Click Quickconnect
Step 3: After connecting, locate your website files and drag them from the left pane to the right pane, targeting public_html. Unzip archives before upload because FTP cannot extract files.
Drag and drop files Illustration: Drag and drop files
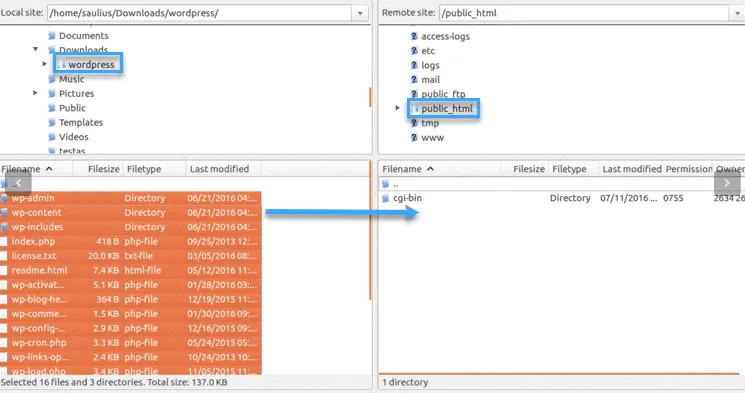
Drag and drop files
Step 4: You can also upload archives via FTP, then extract using File Manager.
Upload archives via FTP Illustration: Upload archives via FTP
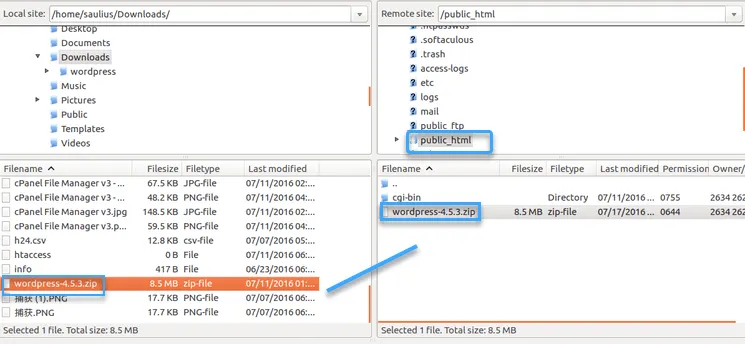
Upload archives via FTP
Step 5: After upload, enter the website URL in a browser to confirm installation or customize it.
Step 2: Verify files are inside public_html
After uploading, check that all files are in public_html. If you extracted a backup into a subfolder, users would need to visit example.com/something instead of example.com. Fix this by moving files:
- Open the folder with the website files.
- Select all files, right-click, and choose Move.
- Select
public_htmland click Proceed.
If your site has been running already, upload the database as well.
After confirming file placement, open your domain in a browser. If DNS is not updated, you can:
- Edit the hosts file to simulate DNS changes.
- Use online tools to check DNS status.
- Install browser plugins for virtual hosts.
If you need to move a site from a subfolder into public_html, use File Manager or FTP. Remember to upload the database if needed.
Step 3: Upload the database to hosting
Perform this step only if your website uses a database.
Create a database in cPanel
Create a new database in MySQL Databases and record:
- MySQL Database
- MySQL User
- MySQL Host
- MySQL Password
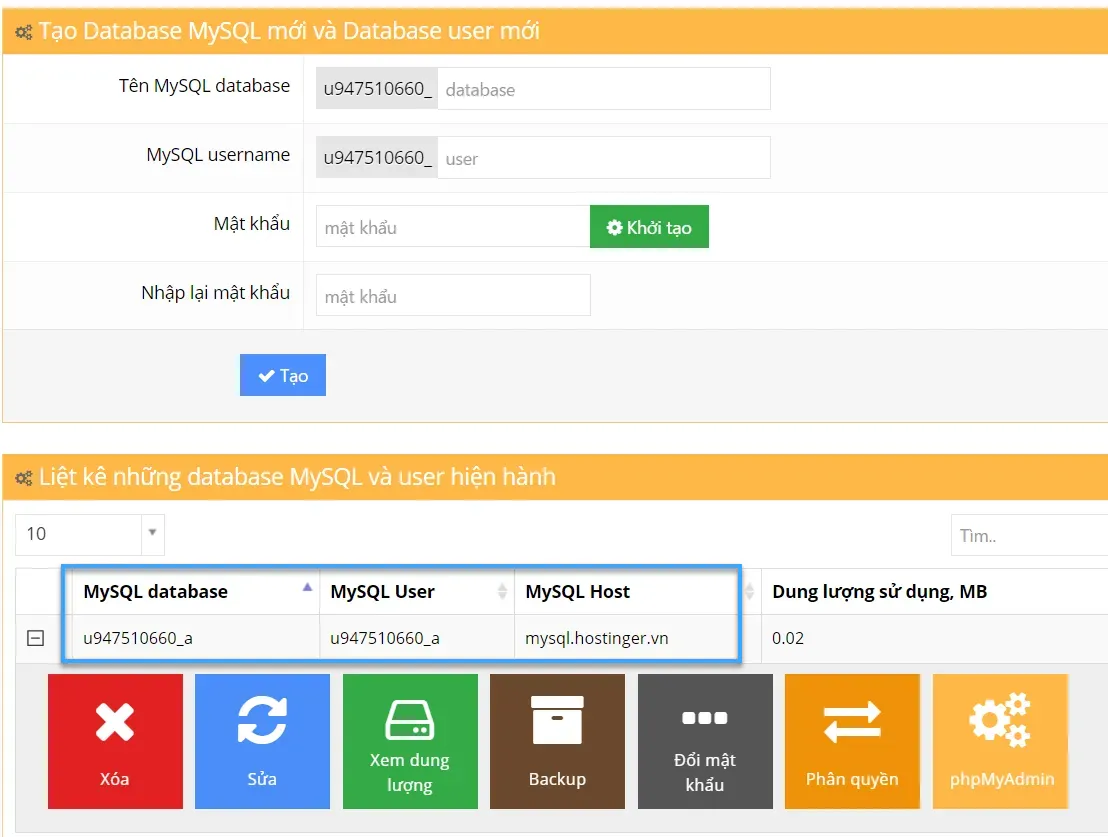
Create a new database
Open phpMyAdmin
In phpMyAdmin, import your MySQL database. If importing into an existing database, clear it first to avoid errors.
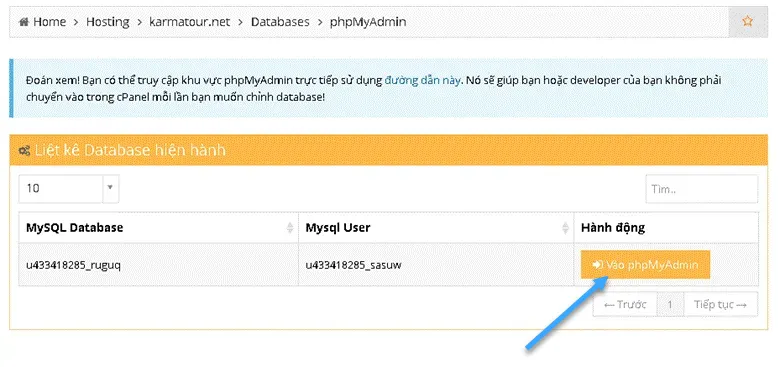
Open phpMyAdmin
Import the database
Go to the Import tab and upload your SQL file (.sql, .sql.zip, or .sql.gz). Click Choose File, then Go to start. When phpMyAdmin shows Import has been successfully finished, 302 queries executed, the upload is done.

Import database
Update configuration for database connection
After upload, open your PHP configuration file and fill in host, database name, username, and password. The file name and location depend on your software. For WordPress, the file is wp-config.php in public_html.
⚠ Notes:
- Large databases should be split into smaller files to speed up uploads.
- If your database contains special characters, convert them to ASCII before upload.
- If import errors occur, check for corruption. Create a fresh database and try again.
- After uploading, test your website to ensure everything works.
Update configuration for database connection
After uploading, open the PHP config file to enter the host, database name, username, and password.
The file name and location depend on your software. For example, WordPress uses wp-config.php in public_html.
Step 4: Check if the website is stable
To ensure stability after upload and domain mapping, perform the following checks:
🔍 Check website access
- Access via domain or IP: If it loads, the site is live.
- Wait for DNS propagation: New DNS changes can take 24 hours.
- Check immediately using:
- 🖥️ Hosts file: Edit the hosts file to simulate DNS changes.
- 🌐 Online tools: Use online DNS checkers.
- 🔌 Browser plugins: Use plugins for virtual hosts.
🛠️ Test website functions
- Visit multiple pages and verify links.
- Ensure features work as expected.
⚡ Check load speed
- Use Google PageSpeed Insights or GTmetrix.
🚨 Check for errors
- 404: Page not found.
- 500: Hosting server error.
- 503: Server maintenance.
🌍 Test across browsers and devices
- Try Chrome, Firefox, Safari, Edge on desktop, mobile, tablet.
⏳ Test at different times
- Performance can vary throughout the day.
👉 If issues appear and you are unsure how to fix them, contact your hosting provider. 🚀
📌 Conclusion
Uploading a website to hosting is a key step for stable online operation. By preparing correctly and following the steps above, you ensure your website is ready to serve users effectively.
💡 If you have questions or need help, leave a comment below. I will respond soon.
Thanks for reading! 🚀